New fun technique: Splash background tutorial
While working on another card with the Polka Dot embossing folder, searching for ideas, something really fun came into my mind.
What if I mess up a little bit with that folders "holes"...?
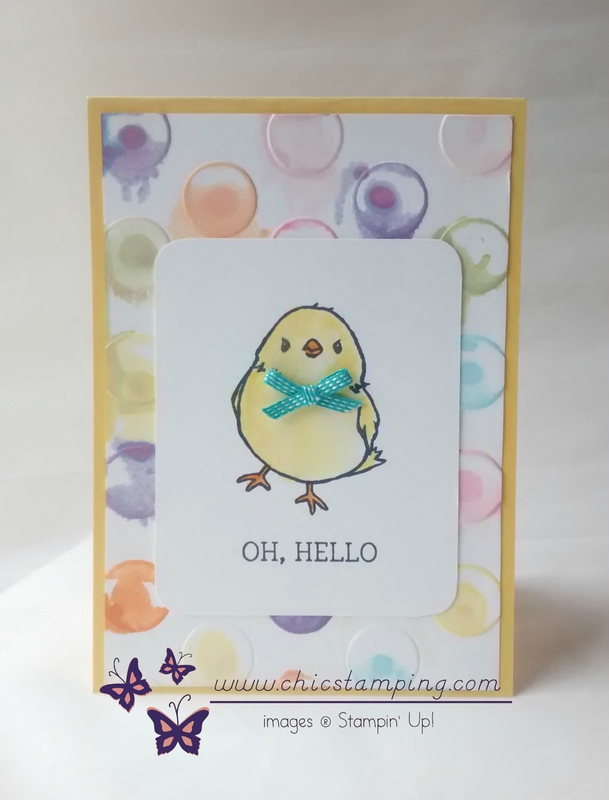
This is a new fun background technique that I created and will share with you today. I call it the "Splash" technique.
Material used on that card:
- FREE Honeycomb Happiness stamp set.
- Bermuda Bay stitched ribbon.
- Reinkers.
- Daffodil Delight and Whisper White cardstock.
- Aqua Painters.
- Polka Dot Embossing Folder.
Colors used on that card:
- Daffodil Delight.
- Pumking Pie.
- Brusing bride.
- Pear Pizza.
- Marina Mist.
- Dusty Concord. (retired purple color)
How did I made this card: Splash tutorial
- Cut your card based into Daffodil Delight, 21 x 14.8 cm and fold in half.
- Cut a piece of Whisper White cardstock (thin, not thick!) 10 x 14.3 cm.
Now you are going to be really messy, protect your table!!! - Open your folder and try as best as you can to keep it flat.
- Fill each holes with a different drop of reinkers of your choice. Check the list above to obtain a similar look as mine.
- Add a little bit of water into each holes too. The amount depend on the look you want to achieve. More water you add, more watercolor look you'll obtain. Over 3-4 drops of water will make the diluated ink go over the holes.
- Place your cardstock on your folder and slide it to the Bigshot cutting pads. Make your "sandwich" and run it into the Bigshot.
- Open your folder and remove your cardstock. You should optain fun little colored dots.
For a more equal look, you can use a wooden stick to diluate your color a little bit more, or just don't as I did for that card. - Cut a small Project Life card base for your chick. 4"x3" Project Life size. Stamp your chick and color it with your aqua painter and Daffodil Delight. Add Pumpking Pie for the beak.
- Stamp your sentiment, assemble your card and add a little bow.
Your card is finished. Wasn't it a fun tutorial for a great background effect?
If you make this background, please show me your result! Leave a comment with the link of your website or Pinterest gallery. I'm very curious about your result!
I shared my technique with the Zoe Tant, my Up-up-upline in our Stampin'Up! team during a team event. Look at the lovely card she made using different colors, I love it. Visit her blog here and leave a little comment too ;)
Please keep in mind that theses instructions are for your personal use ONLY. If you use this step-by-step and show it on social medias or during a , please do not forget to link it back to my blog: www.chicstamping.com. Thank you!
Shop Now
Do you want to order the basic material for this project? Contact me to place your order at adeline7674@hotmail.com or call me at 020.697.22.58. Shipping is free when you come to pick it up in Amsterdam. And yippie! this is still SAB for another 2 days, so free gifts are on your way too when your order is 60 euros or more. Hurry up before it's too late!
Happy Stampin'


/http%3A%2F%2Fstorage.canalblog.com%2F79%2F59%2F791036%2F109092948_o.jpg)
/http%3A%2F%2Fstorage.canalblog.com%2F93%2F85%2F791036%2F108886010_o.jpg)
/http%3A%2F%2Fstorage.canalblog.com%2F35%2F79%2F791036%2F109883202_o.jpg)
/https%3A%2F%2Fstorage.canalblog.com%2F77%2F85%2F791036%2F128817395_o.jpg)
/https%3A%2F%2Fprofilepics.canalblog.com%2Fprofilepics%2F1%2F2%2F128837.jpg)